Problem:
Ignition VM is extremely slow. It may take up to 15 minutes to start the ignition server which is basically a web server
Solution:
I have found a genuine docker version at below address
If you are familiar with Docker do NOT waste your time and read below description.
What is docker:
According to google Docker is an open source containerization platform. It enables developers to package applications into containers—standardized executable components combining application source code.
BUT from my point of view docker is a platform for building running and shipping applications in a consistent manner so if your application works on your development machine it can run and function the same way on other machines. with docker we can easily package up our application with everything it needs and run it in an ISOLATED environment called container. As containers are isolated environments the main OS or host is not affected.
What is the difference between Docker and Virtual Machine: the VM is an abstraction of a machine or physical hardware . each virtual machine needs a full copy of an operating system that needs to be licensed patched and monitored and that’s why these virtual machines are slow to start because the entire operating system has to be loaded just like starting your computer. Another problem is that these virtual machines are resource intensive because each virtual machine takes a slice of the actual physical hardware resources like cpu memory and disk space.
Docker Containers are more lightweight, and they don’t need a full operating system in fact all containers on a single machine share the operating system of the host.
How to install Docker on my machine:
Read below article to Enable Hyper-V on your computer
Enable Hyper-V on Windows 10 | Microsoft Docs
Then Simply go to below address and install the docker
Install Docker Desktop on Windows | Docker Documentation
How to run the container
First step pull the container to your computer the command as mentioned on the page is
docker pull inductiveautomation/ignition
then simply Run the image
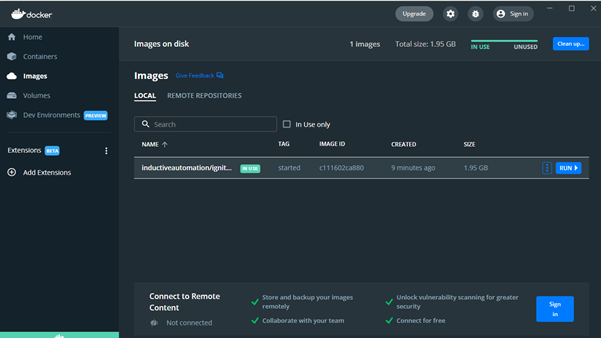
Do not forget to change Port Number (e.g change it to 9088) if 8088 is taken and you can not use it
How to save the changes on the container:
Same as the GIT software we need to push the changes to the image.
Step 1 open command prompt as administrator
Step 2 type “docker ps”. It is a Docker command to list the running containers. We need to find the docker id

Step3 type below command:
docker commit [id] [image: (which isinductiveautomation/ignition) ] [Comment]
You can delete previous version.
How to transfer an image to another PC
The first solution could be Push on the server. If you want to do it on the local PC Use below command:
docker save -o <path for generated tar file> <image name>
don’t forget to put the file name in the path for generating image file
for example:
docker save -o c:/temp/image.tar inductiveautomation/ignition:startedple
Then copy your image to a new system and run below command
docker load -i <path to image tar file>
Ignition Basics
Although most concepts like Tag and graphical components are the same as HMI, it is good to have a quick look on Ignition Terms
When you are developing in Ignition, there are 4 main areas of configuration:
Gateway Configuration
Tags
Images
Projects
Gateway: it is the web app on localhost:(port no). The Ignition Gateway is the primary software service that drives everything in Ignition. It is a single application that runs as a web server and accessed through a web browser. It connects to data and PLCs, executes modules, and communicates with clients.
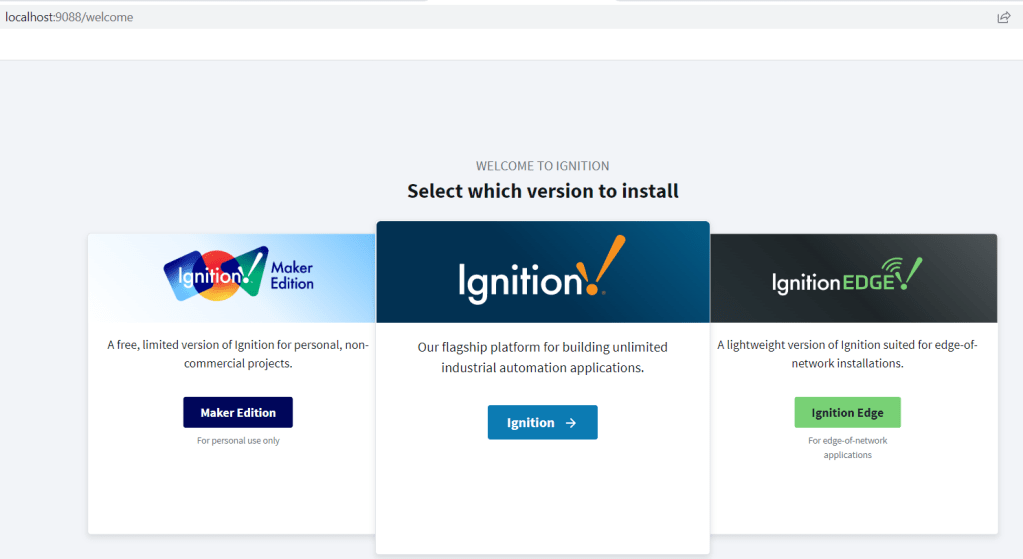
Maker Edition: Ignition Maker Edition is a free license edition that can be strictly used for non-commercial and personal educational use.
Ignition (Standard): Will Talk about it MORE!! and we don’t mentioned Standard anymore
Ignition Edge: Ignition is designed to work on central servers and deployed out to multiple clients. Ignition Edge products are designed to be installed on devices at the edge of the network. Using Ignition and Ignition Edge together, you can build scalable and affordable enterprise-wide systems. It design for MQTT and IoT system
Designer: The Ignition Designer puts you in the driver’s seat with robust development tools, rich component libraries, and SQL integration, so you can quickly build custom applications for centralized data acquisition, enterprise-level analytics, total device control, and more. – Step 1: Connect designer to gateway (e.g lacalhost:9088)
Project: Opens in Designer. In Ignition, a project is a unit of configuration that contains: Windows, views, and components
Vision and Perspective: A Perspective Session is a running instance of an application, much like a Vision client. Whereas Vision clients run as independent Java programs on a user’s machine, a Perspective session runs natively in a web browser (or the Ignition Perspective App). As long as the vision is INDEPENDENT java program it does not require any dependencies outside ignition. on the other hand perspective is dependent on native system.
Session: The term “session” is “client” or “runtime” which sounds more familiar.
Modules: Modules are additional files that allow Ignition to do more. Much like Node.js Modules, adding new modules extends Ignition’s capabilities while offering new ways to approach and solve problems. Most of the main features of Ignition are actually provided by different modules such as the Perspective, Vision and SQL Bridge modules. It is in System in Topic section. the module extension is .modl
GWCMD.bat : it is command line for the gateway . it located in the installed folder of ignition and type gwcm -h for the available commands
Backup/Restore :Basically the gateway back up is like cloning the server and it includes everything. The project is just exports and NO database connection/ etc. bear in mind that Project area is the designer (NOT like gateway) as a result we can export projects from designer section
Networking: Gateway or server communication with each other. in other world it relates to SCADA architecture.
OPC-UA – Device protocol connectivity – Ignition uses OPC to connect to a device. simply add the device- Note that below V20 compact logix is not the same as control logix and after V21 both use the same protocol. as a result in ignition it is called Logix and it should be the same as TCP with default port (44818)
OPC-Client: The server is ignition and obviously the client is the PLC. We can have access to PLC tag through quick client
JDBC: JDBC makes it possible to do establish a connection with a Database or data source, send queries and update statements, and process the results. Simply, JDBC is a driver that makes it possible to do the following things within a Java application: Establish a connection with a data source. Send queries and update statements to the data source. For ignition you need to install this driver manually. using the “Platform Independent” driver instead of windows to save heaps or you PC resources then goto databese driver and put the downloaded jar file as your driver – Link– DB connection use the JDBC driver with “jdbc:mysql://host:port/database” format
Note that SQLite is a relational database management system contained in a C programming library. It is a self-contained, serverless, zero-configuration, transactional SQL database engine. Basically it is embedded DB and NO software is required for this DB
Inheritable Projects : Project Inheritance allows one project to inherit resources from another project. If you have project resources that you want other projects to use such as views, windows, scripts, templates, or pipelines, you can create an inheritable project allowing other projects to inherit those resources. Parent Project is not Run-able and use for
Project Properties : Options like read or Read/Write in com ports/ What tags are automatically needs to created by selecting a component and responsive are configured in this section
Vision Client Launcher: The Vision Client Launcher opens Vision Clients from any Ignition Gateway. in fact this app runs Sessions which are created nd compiled for vision in the designer
Tags
Expression Tags The Expression Tags are driven by an expression, and its values are derived from a calculation. The expression syntax is the same as for property bindings, and allows mathematical operations, references to other Tags, logic operations, functions, and more. This expression example converts Celsius to Fahrenheit.
Memory Tags Memory Tags are simple tags, that do not automatically poll or update their value. They hold the same value until some other entity (script, binding, or some other user-created mechanism) changes their value. They’re useful in situations where a value must be stored outside of a PLC or database.
OPC Tags . (PLC Tags) An OPC Tag is driven by an OPC Item Path and OPC server. The OPC Item Path is a string path to a particular device connection. The exact path is defined by the driver and OPC server used to communicate with the device. Many drivers support browsing, allowing you to automatically create OPC Tags by dragging-and-dropping from the OPC Browser. However, in cases where browsing isn’t supported, OPC Tags can manually be created. (OPC Quick Client)
Simulatior is a device with some predefined tag. we can import the tag device. it is the tag which are in the device or PLC
Query Tags: The Query Tags execute a SQL Query, the result of that query are returned to the value on the tag. Query Tags can reference other Tags to build dynamic queries. This SQL query example is getting the current timestamp.
Reference Tags A Reference Tag simply refers to an existing tag. For example, it can be used to create an alias for the tag or create a scaled version of a tag. The Reference tag can write back to the original Tag.
Tag Provider is basically grouping the tags
Tag Path A Tag path looks something like this: [Tag Provider]folder/folder/tag.property
We use the tag without the .property part for the value in the PLC. in fact these properties are SCADA properties and not PLC. each PLC tag represents/connect to a Scada tag.
The folder (in the path) and also the tag name could be indirect addressing
Dynamic Tag Path
Python Dynamic Tag Path
tankNumber = 2
tagPath = “[default]Tanks/Tank %i/Level” % tankNumber
Expression Dynamic Tag Path
tag(“[default]Tanks/Tank “+{Root Container.tankNumber}+”/Level”)
Perspective Session
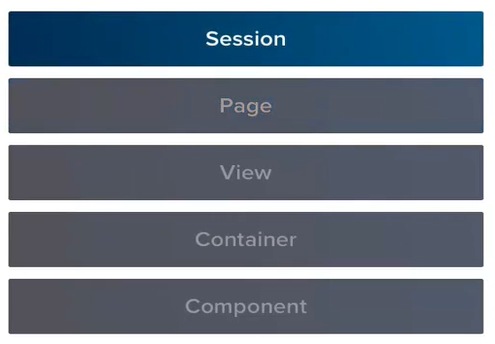
Components are the displays, input fields, tables, and other objects on the screen that your users will be interacting with.
Container: All components must be placed into a container. Containers determine where a component is positioned as well as how the component should behave when the browser is resized.
Look at Coordinate/Column/Tab/Breakpoint/Flex Container for responsive design link
Views are flexible as they can act as a top level screen or a smaller component called an Embedded View. So you can place a View inside of another View. If you wanted to add a sidebar, a popup, or a bunch of smaller, yet complex objects, then you could do that as a single View.
Page is a collection of Views and a URL associated with that Page. Another way to think about a Page is a single tab in your browser and all of the content contained within it. So you could have that sidebar and that main View and both of those would be placed into a single Page.
With Params category properties are exposed on the View, meaning that the Page can directly pass something to the view and the component as a result
Session is a collection of open Pages from a single browser. When your users launch your Perspective application they’re really launching a Session.
Draw
Image: Using file like png is an easy way. select the image from perspective component and in Tools-> Image management copy the path . add “/system/images/” at the first of the address and change the fit to fill.
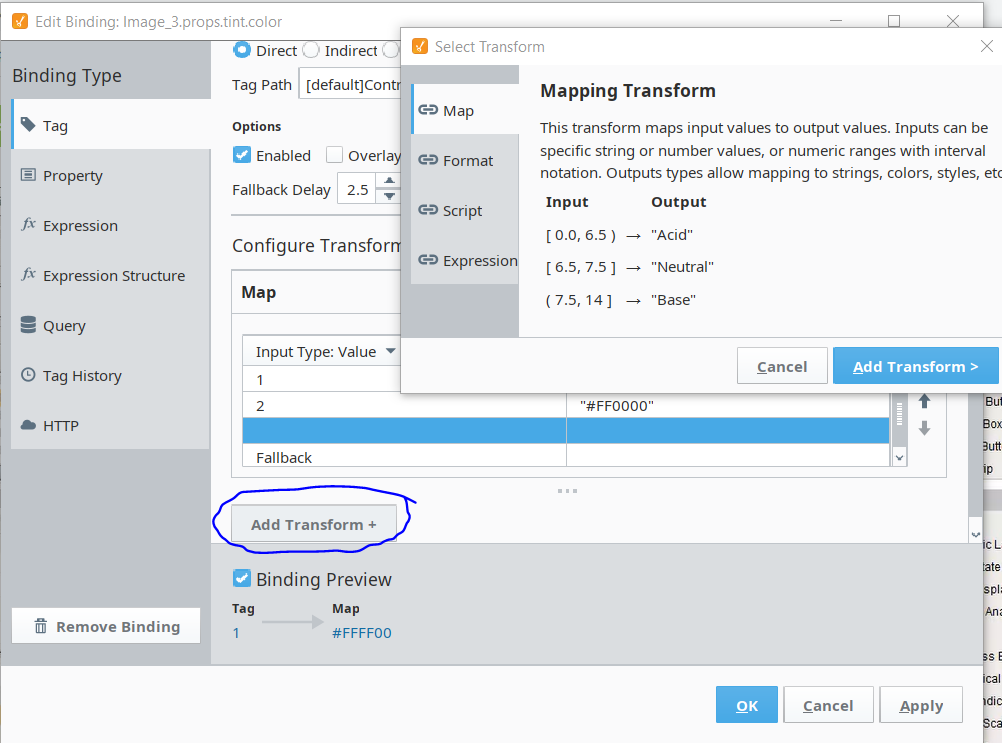
Tint: Tinting a photo means adding a hint of color to suggest the colors in a pleasing way. It does not work on grayscale photo obviously. This property is available by default and simply could be used.
You can put the number directly in the expression section like “#FFFF00” and check whether it works or not then add transform like below picture. Surprisingly even if the expression does NOT work in prop like style still it works in this Transform section.
Line: Pipes are created by a dedicated drawing tool on the toolbar, as opposed to being dragged onto a container like other components
Style : Basically CSS style !! Enabling the Advanced Stylesheet enables us to do CSS coding
Box/Rectangle :Not exist – (unbelievable!!) so you can use Label for that
Momentary Button: No momentary PB !! use below code on mouse up/down event.
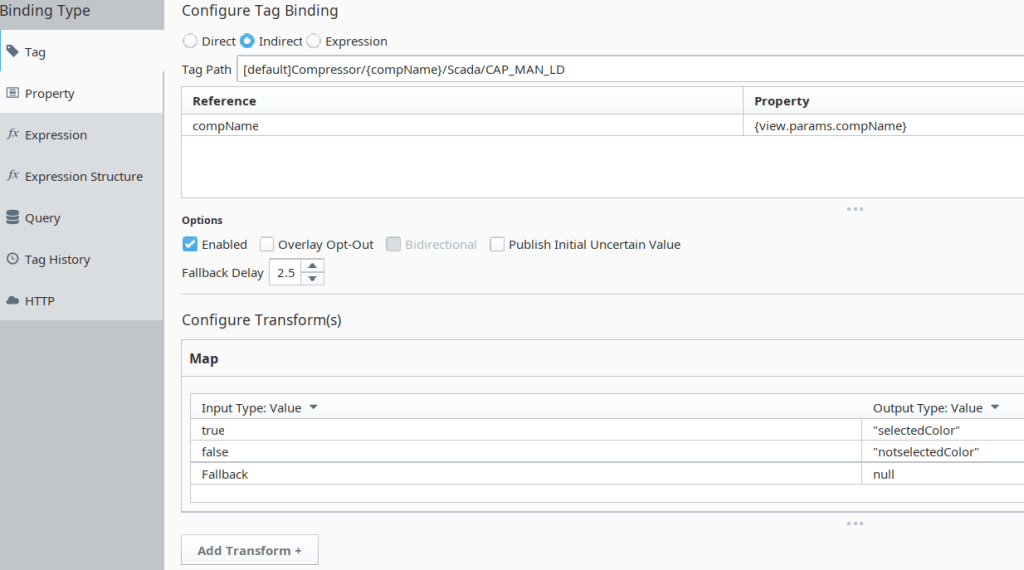
system.tag.write(“[default]Compressor/”+self.view.params.compName+”/Scada/CAP_MAN_LD”, 0)
system.tag.write(“[default]Compressor/”+self.view.params.compName+”/Scada/CAP_MAN_LD”, 1)
Also you can import time and time.sleep(1) for 1 second.
I have created 2 style, 1 for up and 1 for down which is style class (the same as Angular!!)
Embeded View: An embedded view is an instance of a view that is used as a component within another view. there is an embebd view component roughly the same as popup
Animation: Users with extensive backgrounds working with CSS are able to fine-tune styling by modifying the Advanced Stylesheet resource. The stylesheet is an advanced feature and is not placed by default. To enable the Advanced Stylesheet, right-click on the Styles folder and select Enable Advanced Stylesheet.
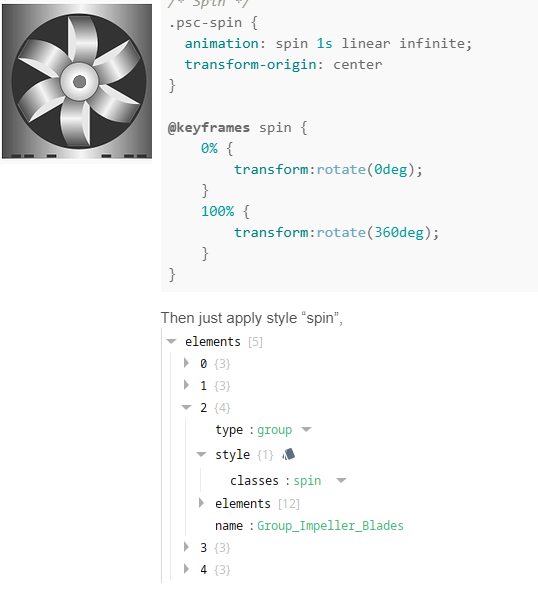
/* Spin */ .psc-spin { animation: spin 1s linear infinite; transform-origin: center } @keyframes spin { 0% { transform:rotate(0deg); } 100% { transform:rotate(360deg); } }
Generic animation is possible too, It is based on the style from 0% to 100% kind of like flash animation concept
Label Number: If the label isn’t showing the correct number formatting, you can add a transform to the binding.

Pipe: right click on the pipe and convert it to drawing. it then the pipe change to component
OPC Tag
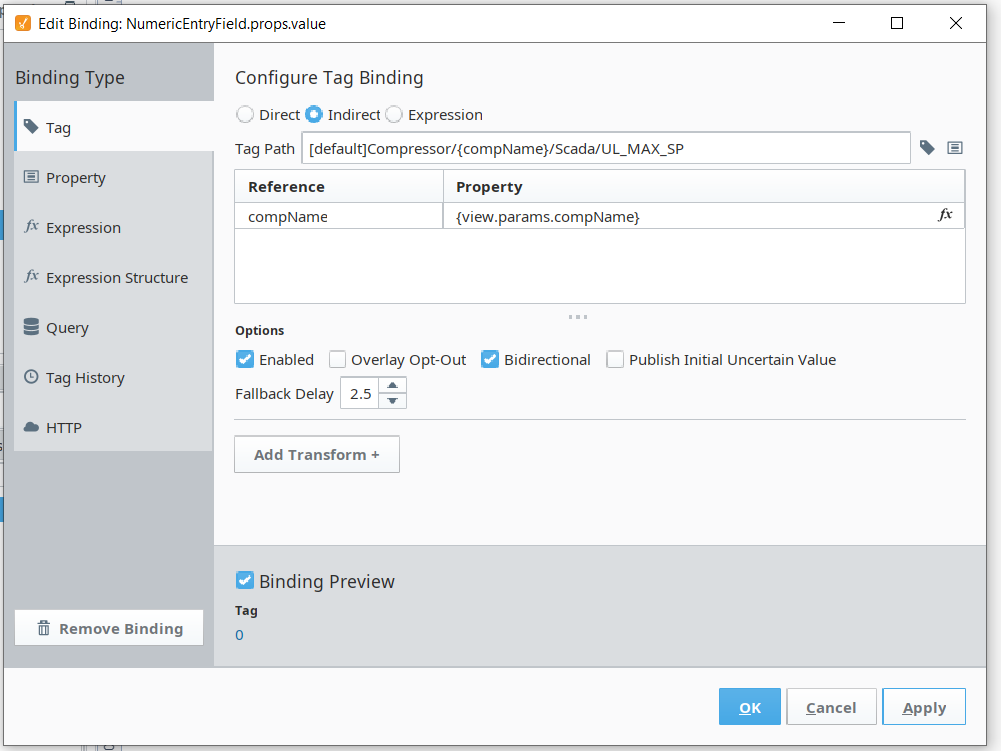
Binding : A Tag binding is a straight-forward binding type. It simply binds a property of usually Component directly to a Tag Property (typically the value). This sets up a subscription for that Tag. Every time the chosen Tag changes, the binding is evaluated and pushes the new value into the bound property. See Tint in Drawing section to find an example
Text Field: Quite simple to do binding props text (the Text Filed) and the tag.value (OPC) in Bidirectional selection
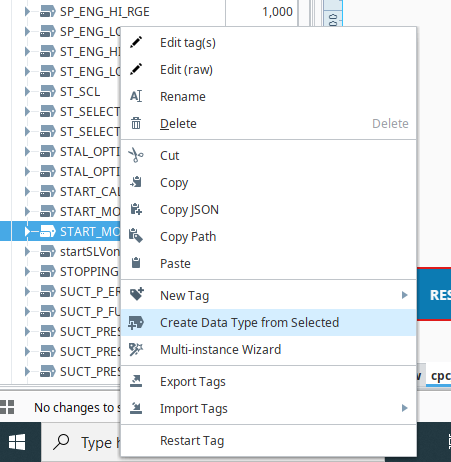
UDT: The simplest way I found is create a UDT in the PLC then create a tag in the plc obviously with the UDT type. Find the tag in the OPC tag list then right click on the tag and select create data type from selected .
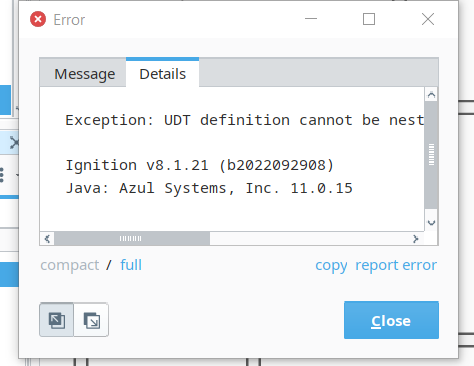
UDT inside UDT is possible – remember if you create udt automatically from PLC udt then it wont be a udt inside udt and it would be a folder- but if you put manually a udt inside udt don’t forget to fill the parameters. Click on create new data type instance
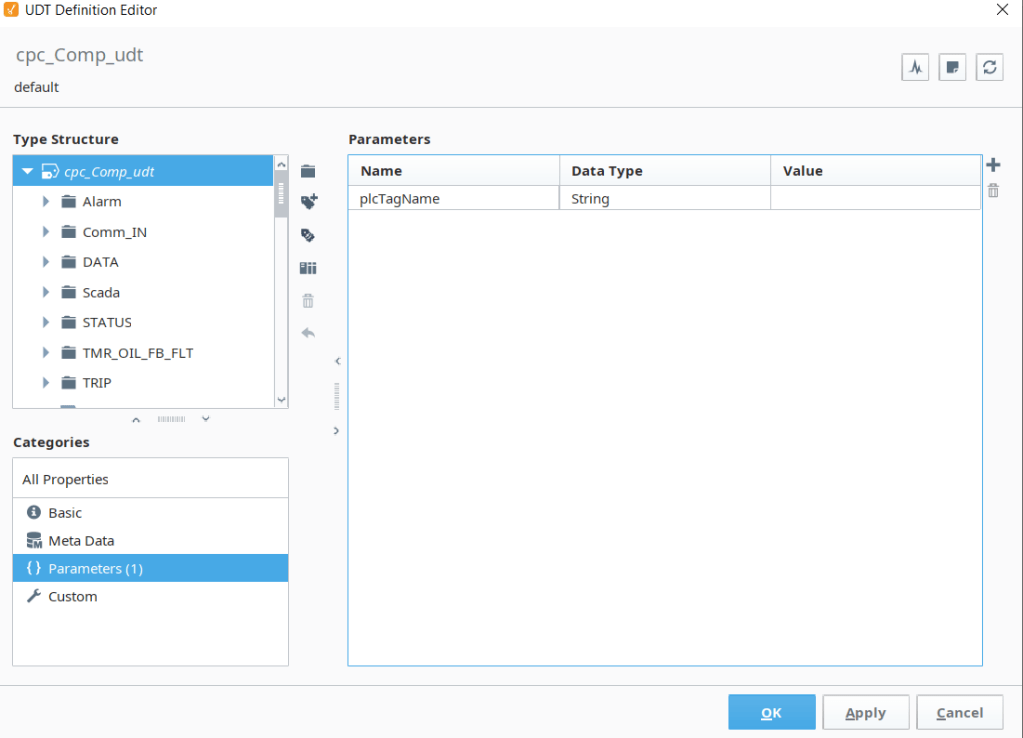
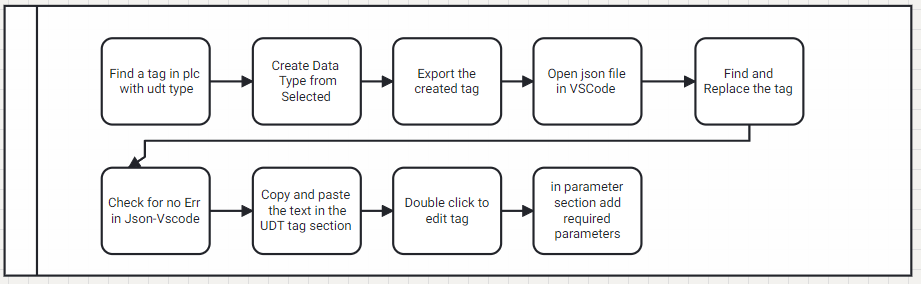
Now export the UDT and open it in a code editor and replace the name with a new parameter I have created in my example {plcTagName} (See udt tag parameter below). copy and paste works the same as import.
Remember to change
“opcItemPath”: CHANGETO “opcItemPath”: {“bindType”: “parameter”,”binding”:
C1 CHANGETO {plcTagName}
,
“dataType” CHANGETO },”dataType” – This line is to close the curly bracket and “dataType” was my first parameter where the curly bracket is required to be closed. I exactly copy it from the json in VSCODE and it is the reason of enter or any other machine characters. Also it may not change in all the document and review may required
TIP: copy the text from Vscode (Ctrl+A, Ctrl+C) and paste in UDT section works as well as import,

Note that even for 1 Digital tag I had to use “create data type option”
parameter: UDT may have a parameter which is NOT in the PLC but it is the parameter that detect ignition tag is point to which PLC tag
Now click on the + and create instant from the UDT
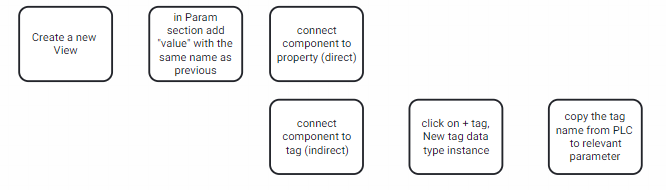
Pass Parameter to PopUP: For popup view to be able to accept the parameter, we must first configure a view parameter. To do this, I go over to my project browser, and I select my popup view by left-clicking on it. On the right hand side of the designer, we see the perspective property editor showing all the properties of my selected view. At the bottom, we see a param section. I will click on the “add view parameter” plus button. Tip: start with tag – select (highlight) the part you want to be dynamic now select view parameter. The rest is easy, back to your main view right click on the button -configure event- on click -popup-select view- add parameter
Boolean by drag and drop a tag in the view screen it automatically create default component which is not button. the reason is button works based Boolean but the PLC send an INT value ( 0,1), I used MultiStateButton which works based on value. with this TRICK the button send 0,1 it interpret as true and false in the indicator value so configure a transform (false->0, true->1) and the control value is 0 and 1
Tag Update: If you change PLC tag e.g delete a tag it is not Automatically updated in designer. Delete and recreate device tag
Script : Document for perspective; e.g. close button system.perspective.closePopup(”) systemTag. Note that script language is Python
Property is a tag too; but not communicate with OPC or other parts
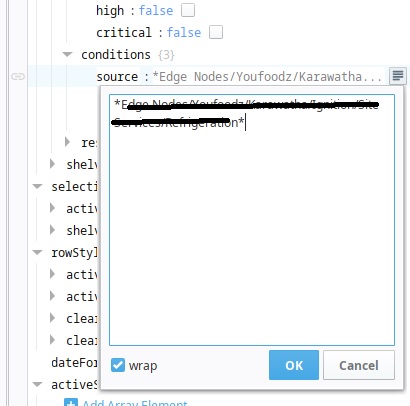
Expression “tag” return the string value of “tag” in other word not a tag but just a useless string. [tag] refers to an address in the gateway (server) location . {tag} return the value of the tag e.g true or false
Pipes
In ignition pipes is basically line!, you can change the width to 1 then it looks like line too. Also Appearance has good options like Line P&Id etc
Alarm
Double click on tag and goto alarm section and add alarm. We can specify a Label property as well as a Display Path property. These properties provide us the chance to override the Name and Source Path properties. Basically, they replace them with more human-readable ones.
AlarmStatusTable component used for monitoring alarms, find the filter and filter what do you want to see.
Alarm Mode Setting is the most important part of alarm configuration. in what situation the tag activates alarm Alarm on bit in an integer From the Mode section dropdown, select Bit State and enter a value for the Bit Position.
Columns is the most important section for how the table looks like
UDT Alarm : I create a new parameter in the UDT called displayname the name of the tag will apear in alarming in compressor path you can add this tag.
Right click on tag and press edit tag in parameter section add new parameter
useFul command
Two Buttons; Below Scripts
self.getSibling("HT_Sec").props.vis_HT=False;
self.props.vis_HT=True;
Meta -> Name: HT_Sec and LT_Sec; Visible relates to HT_Sec
Filter Alarm
Live events are alarm events that are active or not acknowledged and are limited for each alarm by the general alarm settings. Events are something like shutdown the system which is under control.
An Alarm Journal stores historical information about alarms in a database. It can store basic data about alarms that have occurred, such as their source and timestamp, along with associated data on the alarm, and the values of the alarm’s properties at the time the event occurred.
Update
After update I have lost all images to solve this problem, Backs up the user data inside the Ignition Gateway server. This includes all projects, drivers, images, and configuration, but not the modules.
Graph
Activate historical tag- Change historical tag to true and select a database to store the history.
In graph section for binding a tag select tag history and import as dataset. Plot shows what dataset must be shown
Security
Security in Perspective is managed through Identity Providers (IdP). IdPs offer a way for users to log in to Ignition using credentials stored outside of Ignition. This level of security is set up through the Gateway. Setting up Security is covered in the Security section of the User Manual. before creating new Idp users and role must be managed
Managing Users and Roles: On the Gateway Webpage, go to the Config section, and choose Security > Users, Roles from the menu on the left. you can create a new User Source here
Creating a Role
On the selected User Source Click on the manage users link for the User Source you want to manage. Click the Roles tab. Look for the blue arrow at the bottom, and click the Add Role link. Name the role by entering it in the Role Name field, and click on the Add Role button. The role is now available to be associated with specific users.
Click the Edit link for the User you want to edit or click the blue Add User link to add a new user. (When adding a new user, you can also add their roles at the same time).
Now you can create a new IDP and connect it to the created user list
To make a component visible goto gateway and under Security->Users and role more->Manage users we have a list of role and users
now go to the designer the command is below
isAuthorized(false, ‘Authenticated/Roles/Administrator’)
Security Levels
With Security Levels, you define a hierarchy for access inside a Perspective Session. This authorization system provides a way for you to map roles from an Identity Provider (IdP) to Ignition roles. Any IdP can be used to provide roles, and security levels are independent of the type of IdP being used. Any role from the IdP is automatically granted to the user as a role, but only roles in your Security Levels are available to the security screens in the Designer. You can also use the User Grants option to grant additional access to each user.
Security in Project

If problem “hardware assisted virtualization and data execution protection must be enabled in the bios” appeared please run below command
dism.exe /Online /Enable-Feature:Microsoft-Hyper-V /All
or
bcdedit /set hypervisorlaunchtype auto
or
Go in Control Panel -> [Programs] -> [Windows Features] and completely uncheck all Hyper-V related components. Restart the system.
Enable Hyper-V again. Restart.
bear in mind that it may have conflict with VMware, in this situation you may need to disable it for running VM
Perspective on Internet
docker exec -it (container name) – Alternatively by clicking on the container name you can go to the docker environment
1- https://packetriot.com/ – Document (https://packetriot.com/downloads)
(docker run -id –restart always –name hello-world packetriot/pktriot:latest)
(docker exec -it payam pktriot configure) For correct configuration visit info in the tunnels in your panel At the end of this step, you can find a unique hostname
(docker exec -it payam pktriot edit –name payam_tunnel) Rename the tunnel name, you can check tunnel names on your dashboard at packetriot.com
(docker exec -it payam pktriot start)
(docker exec -it payam pktriot http 9088)
(docker exec -it payam pktriot tunnel http add –domain lucid-dawn-47156.pktriot.net –destination localhost –http 9088 –letsencrypt)
Scripting in Ignition
Script Scope
One important thing to keep in mind before scripting in Ignition, is to understand the concept of scope. Within Ignition, there are different scopes:
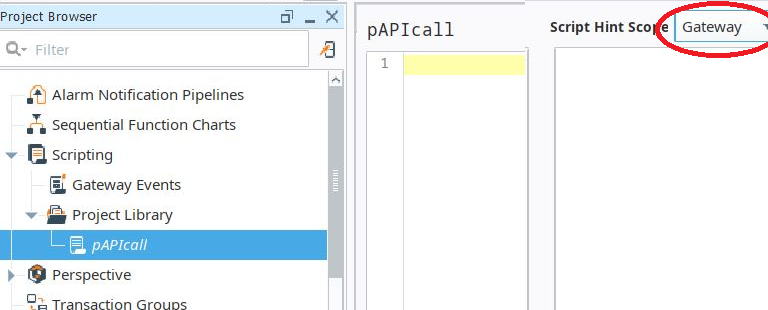
Gateway Scope – The script runs on the gateway. Scripts running in this scope cannot interact with components in the other two scopes.
Perspective Session Scope – The script runs as a part of a Perspective Session. Note that scripts in Perspective execute on the gateway, not in the browser, but this scope is still distinct from the Gateway Scope.
Vision Client Scope – The script runs inside of an instance of a Vision Client.
Where a script was written determines which scope it executes in. For example, Tags are in the Gateway Scope, so Tag Event Scripts execute in the Gateway Scope.
MISC
Citect Explorer
Include file is dependencies
Main project is different from the dependencies
Name is important as they refer to each other based on the name
INI file is for setup the computer
Computer setup wizard
Computer setup editor
Wonderware explained in the Scada Structure Blog
