
Vlog
Why git
In Project Takamoura, three controls engineers are cautiously working on the exact same ACD file, relying on meticulous manual notes and careful code imports to track every modification. Besides the massive amount of time wasted on manually tracking these changes, the biggest weak point is that there is no machine in the loop, meaning the potential for human error is at its maximum. To solve this, the Takamoura project needs to adopt Git, a distributed version control system developed in the IT world that acts as an automated system to seamlessly record and track changes over time.
Git simply tracks changes and allows multiple engineers to collaborate on the same project simultaneously without overwriting each other’s work. Let’s say Controls Engineer 1 works on a completely different routing and rung of the code than Controls Engineer 2. They do not need to worry about each other’s changes because Git gives them a green flag, automatically merging their separate modifications together. However, if Git detects that they have edited the exact same rung, a code conflict occurs. It is Git’s job to throw a red flag and put the “human in the loop,” notifying the engineers so they can manually review and resolve the overlapping code before the merge is finalized.
Is Git Safe
Git itself is a highly secure version control concept—not a company or platform—that uses cryptographic hashing to track every commit, making it nearly impossible to secretly alter your project’s history. GitHub is simply a public platform that utilizes Git; while it is probably secure enough, it is not your only option. For maximum privacy and control, you can use alternatives like GitLab to securely host your own Git repositories directly on your internal servers.
How to integrate Studio 5000 and Git
Step 1: Set up your environment Before downloading the tools, verify that your PC has the necessary software installed to support the integration. You must have three things installed:
- Studio 5000 Logix Designer (Version 20.04 or later is generally recommended for XML support).
- Studio 5000 Logix Designer SDK (This is required to automate the background import/export processes).
- Git (The core version control software).
Step 2: Obtain and build the VCS Custom Tools
- Where to download: Rockwell Automation hosts these free tools on their public GitHub page. The exact URL to find the tools is:
https://github.com/RockwellAutomation/ra-logix-designer-vcs-custom-tools. - How to build the .exe: Because there is no pre-compiled
.exeto download directly, you must build it from the source code.- Open a Command Prompt window on your PC.
- Type
git clone https://github.com/RockwellAutomation/ra-logix-designer-vcs-custom-toolsand press Enter to download the files to your computer. - Install .net SDK (NOT just the runtime)
- Type
cd ra-logix-designer-vcs-custom-toolsto navigate into the new folder. - Type dotnet
build-c Release and press Enter. This command will automatically compile the .NET X.0 utilities into an executable file for you.
Step 3: Integrate the tools into the Studio 5000 UI To avoid using the command line every time you want to commit code, you can place these tools directly inside the Studio 5000 application interface.
- Open your Windows File Explorer and navigate into the newly built VCS Custom Tools folder.
- Locate a file named
CustomMenu.xml. - Copy
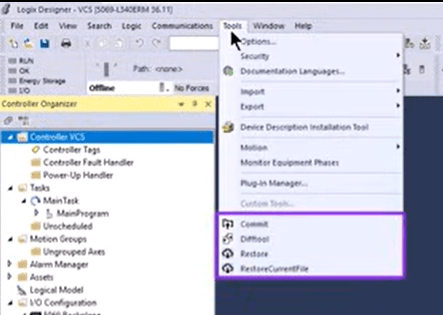
CustomMenu.xmland paste it into the Common folder of your main RSLogix 5000 installation directory (usually found under yourC:\Program Files (x86)\Rockwell Software\path). - Restart the Studio 5000 Logix Designer application. When you look at the top menu bar, click on the Tools Menu. You will now see the new VCS commands (like “Commit”, “Difftool”, and “Restore”) available directly in the dropdown
Sharing
The friction between security and collaboration is inherent.
In most corporations, IT authentication and security policies are designed to lock down data, making free file sharing impossible.
If IT had their way, the code would be locked away.
However, sharing that exact same code isn’t a security breach when a team of controls engineers is trying to commission a complex machine together.
1. The Old Reliable: “Sneakernet”
How Authentication Works: It doesn’t. Authentication is entirely physical. If you hold the physical USB drive, you can access the code.
Sneakernet and Git: If network sharing is strictly forbidden in highly restricted environments, there is a hybrid approach: using Git and Sneakernet together. While carrying a USB drive across the plant floor feels archaic, it changes the game completely when you use it to transfer localized Git repositories (or Git bundles) rather than raw .ACD files. The major advantage is that your project’s history remains strictly under your control. Despite the repository not being live or network-accessible, all modifications are still tracked, cryptographically hashed, and attributed to the right engineer, ensuring a perfect audit trail.
2. The IT Dream: Cloud Git Services (GitHub, GitLab)
If you talk to an IT professional about version control, their immediate answer will be a cloud-hosted Git service like GitHub, Bitbucket, or GitLab’s cloud offering. These platforms are absolute powerhouses for collaboration.
- How Authentication Works: Enterprise-grade security. These platforms tie directly into a company’s Single Sign-On (SSO) or Active Directory. Code pushes are cryptographically verified, backed by Two-Factor Authentication (2FA), and logged in immutable cloud databases.
- The Problem with OT: Cloud Git requires internet access. Getting connected to the outside web is not an easy process. It is almost impossible to convince IT to open a hole in the firewall just so a PLC programming machine can communicate with GitHub, since these systems are strictly isolated by design.
3. Local Gitea Servers
The middle ground for a restricted controls environment is to run a lightweight Git server locally on a virtual machine like Gitea.
- How Authentication Works: Gitea acts as its own independent security guard. There is no need for it to connect to the corporate Active Directory or the Internet. Within the Gitea application’s built-in database, the server administrator creates specific, localized user accounts.
- Engineers push changes from their isolated Studio 5000 VM to Gitea using their local credentials. As a result, every commit can be securely traced back to a specific individual, ensuring an audit trail is complete. No traffic leaves the local network, and the controls engineers get the safety of modern version control without the administrative burden.


